So I bought this ottoman many moons ago at a local thrift shop. It is very sturdily (did I just make that word up?) built, but pretty drab in color. I knew that I could spice it up with some fabric and a few staples on my own, so I bought it... for a grand total of $25.
(Please ignore the messy playroom scene in the background)
I drove home with my purchase just dying to get started on the re-vamp.
But then it just sat there... and sat there... and everyday I would look at it and say to myself, "self, you really should get started on that ottoman. It's just begging for new life!".
Well, finally, over this past weekend, when we were all snowed in (I'm talking 3 feet of snow is just a little over 24 hours here, folks!) I finally found the time to sit down with my staple gun and get cracking. And here is the result! (Step by Step photos for your viewing pleasure)
Step 1. Start a home improvement themed blog so that you'll get your act together and finally decide to get to work.
Step 2. Gather tools - I needed a phillips head screwdriver (I used our power drill attachment), a socket wrench, staples and my manual staple gun, scissors, the material I wanted to use to recover the piece, and a big can of elbow grease.
Step 3. Cut the fabric to fit - enough that you leave yourself a couple inches extra on each side. This will be trimmed later, but makes it much easier to staple.
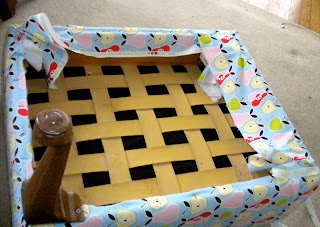
Step 4. Flip the piece over onto it's top placing it in the center of the wrong side of the fabric. Remove legs if possible.
Step 5. After removing all of the legs, staple each side of the fabric, starting with one staple in the center of each side. This will help you to make sure that the fabric stays even and straight during the entire process.
NOTE: The corners can be tricky. I chose to do mine in a "hospital corners" fashion. Really I just folded them under in different ways until I found a way that I liked. Then I stapled the bejesus out of it.
Step 6. Once the fabric has been stapled all around, you'll need to cut away any excess fabric (see left and bottom edges in photo). Then you may begin to re-attach the legs. ***
Step 7. Once all legs have been re-attached and secured, flip your piece over and admire your work! Show it to your 19-month-old daughter and watch her climb up and bounce on your newly finished piece (and say a silent prayer that you put enough staples in... good news, I did!).
Final cost for the project - $25! I had the fabric left over from another project that I did a year ago. I thought the playful print would work well in our sunroom/playroom/office, and as a bonus, it coordinates with the existing wall color in the room!
I hope you're week starts off with a creative bang too!
***I still want to re-paint the legs in a more coordinated color and plan on doing so as soon as I decide what color that will be and go pick up a can-o-spray paint. I'll be sure to share the completely finished product when that is done!


Super cute! I love the apples.
ReplyDelete