Pages

Jan 31, 2011

Ode to an ugly shelf

Let me start by saying that I love our house.  It was built in 1927 and is full of character and quirks, thick wood moldings and lots of built-in storage.  With all of the good, however, we have our share of... um... challenges.  Very creaky wood floors, drafty old windows, and bathrooms desperately in need of updating.

All of these things will be remedied in good time, but until we can afford to do a total overhaul on those spaces, I am doing my best to fix them up on the cheap.  One example is this quick shelf update that took place in our first floor bathroom.  We have great built in shelves, they just needed a little love...

Specifically, I needed to cover the bottom shelf.  Unlike the other shelves in the cabinet, it is not a removable piece.  So I figured the best thing to do would be to cover it up!
I gathered my leftover shelf paper and some pieces of cardboard left from a car seat box.

I fit the card board to the shelf bottom (1).  
Then I laid out all of the other pieces, like a jigsaw puzzle (2).  
I taped the pieces together using masking tape (3) to make sure that they wouldn't fall apart when I removed them.

Then I flipped the taped cardboard over onto the shelf paper.  This shelf paper is self adhesive, so It was just a matter of trimming it to the right size, with about 1.5" extra length on each side for fold over.  (You  will need to trim the corners slightly to make them fold nice and flat.)

You could probably use any type of durable paper (or even fabric!) to cover your shelf with.  Just be mindful of what you store there and make sure the covering can handle it!

Finally, flip your piece back over, smooth out any wrinkles, place it in the bottom of the shelf unit, and Voila!

Then I re-loaded all of the items that I store there.  It looks much fresher and cleaner, don't you think?

Here is a side-by-side before & after

Aaah.  Much better.


Total cost of project:  $0.00
Total time spent:  15 minutes
Quick, easy, and best of all, Free!

Jan 28, 2011

Love is in the air...

Last weekend we hosted assorted family members (my dad, my grandma, various aunts, an uncle and a cousin or two) at our house for a 2 day sports extravaganza.  You see, I come from a long line (and a huge family) of Notre Dame fans.  And given that I live less than a mile from campus, my house has become quite popular during football and basketball season.  And I love.every.minute of being able to host my vistors.

They come from far away lands, you know...  Like Chicago, Missouri, Kansas...  and Connecticut...

Anyway, as I was preparing the house for my guests' arrival, I felt it was looking a little dull.  I had taken the Christmas decorations down a couple weeks prior, and it was feeling empty around here.  So what better time is there to start decorating for Valentines day?!

I didn't want to spend any money if I could help it, so I dug deep into my scrapbooking supplies, and here's what I came up with:


This is our "mantle".  We don't actually have a fireplace, but we have this wide ledge next to our front stairway that I have adopted as our mantle... we hang our Christmas stockings here and it serves as the home for all of our favorite family portraits.

(please excuse the glare from the window.  The sun is out for approximately the 2nd time since 
November here in Northern Indiana!)


Everything I needed to know to decorate this spot, I learned in Kindergarten.  Literally.  I just chose a bunch of different patterns of pink and red craft paper, folded it in half, and used my safety scissors cut out a bunch of different sized hearts at random.  Then a little scotch tape magic and they were up!

***


Above my kitchen sink... my kiddo on her 1st Valentines day last year. 
(pink heart frame -- Goodwill, $0.50).

***


The back door needed a little love too.
I just sandwiched a length of decorative ribbon between two cut-out hearts and taped it to the curtain rod.
There are a few more of these in all different sizes hanging in various windows and doorways throughout the house, but my house is too messy right now to photograph those I think you get the picture.

***


And last but certainly not least, this little painting... which was made for me by my little sister (who is 10 years younger than I am) in 2005...when she was 11.  It sits in the corner of my kitchen under the microwave.

If you look closely, you'll notice that the bananas are sitting in the fruit bowl, browning away, while the small white dish that used to contain a large bag's worth of M&M's is already empty.  
That is how we roll around here.

***

I have a few more projects in mind, once I get a chance (hopefully over the weekend - no sports to watch!), and I will post them as I get them done.

Until then, have a good weekend.

And spread some love around!


Jan 25, 2011

Airing my Dirty Cabinets

Today's post shows you a little glimpse into the organizing that has been happening in spurts around my house since the new year began.  Unfortunately, I didn't get any before photos of the other spaces I perged, organized, and updated.  So instead, you get a taste of it in the form of my 1st floor bathroom cabinet fix up.

This took only about 20 minutes.

And now when I look at it, I smile (instead of cringe).

And the best part about it is the price tag: $0.00


I went from this:


To this:


by repurposing containers and spending nothing but time!

After cleaning out my kitchen cabinets earlier in the day, I discovered a plethora -- a veritable cornucopia -- of mismatched or lid-less containers.  Just before I tossed them into the donation pile, it occurred to me that they could find a new life right here in my very own bathroom cabinets.

As you can see from the photo, the clear plastic container simply received a label.
The Cool Whip container, on the other hand, needed a little updating before I was satisfied.

So I grabbed a piece of extra scrap booking paper, a pair of scissors, and some tape.
(pay no attention to the random baby first aid accessories on the table - bulb syringe anyone?)


I rolled the container along the paper and traced the edges with a pen.
Then cut along the traced lines.


Finally, I taped the paper to the outside of the container (I didn't have any double sided tape on hand, so I simply did the little single-sided-tape-loop trick to make it stick), added a label, and VOILA!


Lucky for me, my kitchen yielded quite a few extra containers of all sizes.  
No messy cabinet stands a chance.

Happy Organizing!


Jan 20, 2011

Ribbons and Bows

Today, a simple, quick craft.  
All you need is a basic headband, a few yards of your favorite ribbon, and a hot glue gun.
My mom used to do this for/with me when I was a little girl.

I loved having ribbons in my hair.
(Still do.)

Simple Ribbon Headband

1.  Gather your supplies - headband, ribbon of choice, hot glue gun (not pictured).

2.  Place a dollop of glue on the bottom inside surface of one of the arms of the headband and attach the ribbon.  You'll have to fold the end of the ribbon around the bottom edge of the headband's arm in order to cover the tip.  (I just played with it a couple times before gluing to make sure I had it right).


3.  Give the end a moment to dry.  Once it is secure, begin wrapping the ribbon around the headband, making sure to overlap each turn of the ribbon over the last (how much overlap depends on the width of the ribbon and how much pattern you want to show).  Be sure to add a small bead of hot glue every so often along the way to secure the ribbon to the headband.

**I am missing a few photos here of the next couple steps, but they're not too difficult to do!  Next time I'll be more diligent with my photo documentation.**

4. Once you have wrapped the ribbon enough to cover the entire headband, fold the final end under and secure with another dollop of hot glue.  
(Dollop is a fun word, no?)

5.  You can certainly stop after step 4 and have a cute, personalized headband.  

You can also keep going by adding an embellishment.  
Since this particular band was for my 1-year-old daughter, I went with a bow made from the same ribbon.  But you can use whatever decoration you like!  
A flower!
A brooch!
Feathers!
You could even Bedazzle it!  
(Bedazzle - another fun word)

(I made this bow by folding the ribbon a few times and hot gluing them together with a center band)


An in about with about 15 minutes worth of work and $5 worth of supplies, you have the perfect head adornment!


And if this headband can stand up to my daughter during a family holiday, then it's virtually indestructible.
Now if only I can figure out how to get her to keep it on her head and stop pulling it off and throwing it across the room... It probably wouldn't be good to hot glue it to her head...right?

Oh, but I love my hot glue gun.

Happy Crafting!

Jan 14, 2011

This Weeks Obsessions

One of my favorite things to do during my "downtime" (aka, naptime for the kiddo) is surf my favorite home decor shops online and fawn over all of the beautiful things that I.wish.I.wish.I.wish I had for my own house!  So I thought it might be fun to share some of my faves from this week.  

Here are a few things I have been drooling over lately:

Dash & Albert Rugs - I would put one of these beauties in every room of my house if I could!

(Photo Cred: dashandalbert.com)

I LOVE color, and it is often hard to find area rugs that use the bright and cheerful colors that are so dear to my whimsical little heart.  Enter Dash & Albert.  Their rugs are beautiful - everything from sweet stripes, to funky botanicals, to playful plaids - they've got it all!  And their rugs don't appeal only to the bright-color-lovers like me... they've got beautiful neutrals and muted tones as well.

Not to mention, the prices are quite reasonable for well made area rugs.

And they make pillows and blankets too!  Check them out here to add one of their great pieces to your decor!
***

The Chas Armchair from Pier1 Imports - I mean, seriously.  I'm pretty sure this chair is furniture's version of a hug.  I can just imagine curling up right here with my nap blanket and falling asleep immediately reading a good book.

(Photo Cred: Pier1.com)

Imagine two of these babies and a nice cushy ottoman cozied up to a warm fire... Sounds like heaven to me. (Just add cocoa!)

***

Candle Sconces - like these from Pottery Barn or this from Z Gallerie (if you're feeling more inspired by nature).  Grouped together or place individually flanking a mirror or piece of art, the warm glow from a candle sets the tone for any room in the house.  

(Photo Cred:  potterybarn.com)

(Photo Cred: zgallerie.com)

I am already picturing the Z Gallerie version  in my dining room (but that's for another post, another time)...

***

Decorative Knobs - the right knob, accompanied by a little paint, can transform the most drab dresser into a showpiece.  Here are a few that I am currently digging...


(Photo Cred: 1 and 4 - Anthropologie.com, 2 and 3 - MacKenzieChilds.com)

And for the more budget conscious, there's always trusty ol' Target:


Find these knobs here, here, and here.  And then redo all of your dressers with them :).

***

And last but not least - I am obsessed right now with getting organized!  (I know, kinda boring to most people, but not to me!)  I have actually put many of my "make it prettier" projects on hold for more of my "make it more functional" endeavors.  But who says you can't pretty things up and organize them at the same time??  Here are a few things that will help accomplish just that!


(Photo Cred:  Ikea.com and Target.com)

The links for these actual pieces are below, but I often find boxes and bins that are just as cute at Marshalls, TJ Maxx, and believe it or not, even Goodwill.  (Oh man, I love me some Goodwill hunting! --get it?  GoodWill Hunting??  heehee!)

Find these items here, here, here, and here.  And then whip your house into shape!

Of course there are so many treasures out there, I could make this post last for days, but I'll be back to cover more of my favorites with another list next week!  In the meantime, happy window shopping!!

***

Disclaimer:  I have not been paid by any of the companies listed in this post, nor have I been given any free swag.  
I just love these products and want my readers to have a chance to love them too!


Jan 10, 2011

Ottoman Update: Phase One

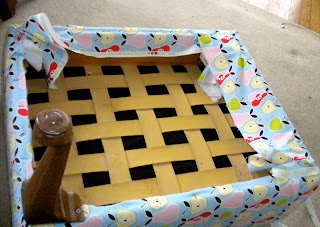
So I bought this ottoman many moons ago at a local thrift shop.  It is very sturdily (did I just make that word up?) built, but pretty drab in color.  I knew that I could spice it up with some fabric and a few staples on my own, so I bought it... for a grand total of $25.  


(Please ignore the messy playroom scene in the background)


I drove home with my purchase just dying to get started on the re-vamp.
But then it just sat there... and sat there... and everyday I would look at it and say to myself, "self, you really should get started on that ottoman.  It's just begging for new life!".

Well, finally, over this past weekend, when we were all snowed in (I'm talking 3 feet of snow is just a little over 24 hours here, folks!)  I finally found the time to sit down with my staple gun and get cracking.  And here is the result!  (Step by Step photos for your viewing pleasure)

Step 1.  Start a home improvement themed blog so that you'll get your act together and finally decide to get to work.

Step 2.  Gather tools - I needed a phillips head screwdriver  (I used our power drill attachment), a socket wrench, staples and my manual staple gun, scissors, the material I wanted to use to recover the piece, and a big can of elbow grease.

Step 3.  Cut the fabric to fit - enough that you leave yourself a couple inches extra on each side.  This will be trimmed later, but makes it much easier to staple.

Step 4.  Flip the piece over onto it's top placing it in the center of the wrong side of the fabric.  Remove legs if possible.

Step 5.  After removing all of the legs, staple each side of the fabric, starting with one staple in the center of each side.  This will help you to make sure that the fabric stays even and straight during the entire process.

NOTE:  The corners can be tricky.  I chose to do mine in a "hospital corners" fashion.  Really I just folded them under in different ways until I found a way that I liked.  Then I stapled the bejesus out of it.

Step 6.  Once the fabric has been stapled all around, you'll need to cut away any excess fabric (see left and bottom edges in photo).  Then you may begin to re-attach the legs. ***


Step 7.  Once all legs have been re-attached and secured, flip your piece over and admire your work!  Show it to your 19-month-old daughter and watch her climb up and bounce on your newly finished piece (and say a silent prayer that you put enough staples in... good news, I did!).


Final cost for the project - $25!  I had the fabric left over from another project that I did a year ago.  I thought the playful print would work well in our sunroom/playroom/office, and as a bonus, it coordinates with the existing wall color in the room!

I hope you're week starts off with a creative bang too!


***I still want to re-paint the legs in a more coordinated color and plan on doing so as soon as I decide what color that will be and go pick up a can-o-spray paint.  I'll be sure to share the completely finished product when that is done!


Jan 8, 2011

Lake Effect

This is my first DIY project of the year.

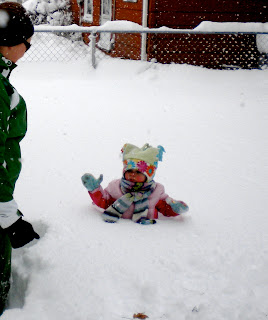
I am calling it "Nature's Playpen".

(This is my daughter Clare... and yes, she is standing up.. snow up to her armpits)

I hope you're all staying warm!

Jan 6, 2011

Putting my money where my daydreams are... so to speak...

I have always loved to create things.  Since my very first art class as a youngster, I have been drawn (no pun intended...har har!) to all things artistic.  I would much rather give (and receive, for that matter) gifts that are handmade.  Now, don't get me wrong... I love a good store-bought item (currently I am drooling over these boots) as much as the next girl... it's just that, in my heart of hearts, I love to create.

I am most at peace in spaces that I have created myself... and I have lots of ideas on how to do just exactly that.  My daydreaming moments are spent re-imagining all the nooks and crannies of my house, and my free time is spent surfing crafting and design blogs.  I have made my husband help me re-arrange the rooms in our house so many times, I can detect a shiver up his spine when I start a sentence with "Hey honey, I was thinking...".

The trick, the challenge, and in my idea the fun of it all, is figuring out how to do these projects for pennies on the dollar.  I get a thrill out of creating beautiful things from what others might consider to be junk.  "One man's trash is another man's treasure", as they say.

So I hope to use this blog to bring "A Pinch of Creativity" to anyone who happens to stumble upon it.   I'll tackle everything from Home Decor to Paper Crafts to Kids Clothes (and if I get really brave, maybe even clothing for myself!**).  So come along for the ride... I am learning as I go, so I promise it will be an adventure!

**(I just got a sewing machine for Christmas, so I am looking forward to becoming a self-taught seamstress... we shall see!!)